Let's Play with Clay!
Welcome to my Clay Corner of PTownSubbie.com. I have always had a soft spot for arts and crafts, especially polymer clay, as a way to personalize the pen gifts we offer. I've combined all my latest curriculum into one interactive page.
What is Polymer Clay?
|
Oven baked modeling clay – not actual mineral clay Basic Ingredients: PVC resin and liquid plasticizer Polymer Clay Brands – recommended for pen making You can read online for more info of the brands and recommended uses for each polymer clay brand. I primarily use Kato Clay for making pen designs. Sculpey Premo! – sculpey.com Kato Poly Clay – katopolyclay.com Fimo Professional – staedtler.us/en/
|

Polymer Clay Tools
You-Tube Video - Getting Started with Polymer Clay Tools
|
Tissue Blades Acrylic Rollers Miscellaneous
|

 |
 |
Polymer Clay Craft / Pasta Machines
Craft / Pasta Machines are used with polymer clay to help condition, mix colors, or create skinner blends.
- Conditioning is the act of restoring the clay to a state close to its original factory-mixed condition.
- Polymer Clay can be mixed like paint to create new colors or mixture of colors you want to achieve. You-Tube Video - Mixing Clay Colors
- Example of a skinner blend will be shared later in this lesson.
|
Amaco / Sculpey / Makin etc. – found at many local hobby stores Marcato Atlas 150mm or 180mm – w / optional motor Modified Atlas Pasta Machines – monakissel.com/toolspasta.html Lucy Clay Tools – lucyclay.com/tools/ |
Work Surface

|
Smooth Clean Surface – Ceramic Tile / Tempered Glass Good Lighting – Ott Natural Daylight Lamp Polymer Clay Storage – cool location, away from sunlight, plastic containers - recycle numbers 1, 2, 4, and 5 (test the storage options you choose for any leaching or moisture buildup) |
Making Polymer Clay Canes
Millefiori - History of Cane Making(Italian: [milleˈfjoːri]) is a glasswork technique which produces distinctive decorative patterns on glassware. The term millefiori is a combination of the Italian words "mille" (thousand) and "fiori" (flowers) Citation: https://en.wikipedia.org/wiki/Millefiori

Making canes with polymer clay is similar in techniques originally learned by artists creating millefiori. Polymer clay canes can be hand-made or purchased online. It all depends on how much time and energy you can devote to learning the necessary skills. Whether you make or buy canes, it only takes a few dollars of clay per pen tube, so the cost of clay is minimal. What can be expensive is the tutorials and tools you may want to purchase to help you get better. For more info, please visit my canemaking tutorial.
 |

|
 |
 |
Skinner Blend is the gradation of colors from light to dark and creates beautiful depth, helping to make your cane designs look more realistic.
You-Tube Video - Skinner Blend


|
 |
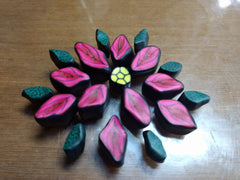
Packing is process of backfilling around core cane components to maintain petal formation.

How to Make a Basic Flower Cane
Blend the colors you want for your flower components including (1) center and up to (8) petals. Depending on the style of flower design you want, these petals can be either solid colors or a skinner blend of many colors.
- For better contrast, add a thin black (or white or translucent) layer to the polymer clay canes. Pinch the sides of the cane circle to create triangle or slight u-shaped canes.
- Create a pattern or design in the clay you want to use for your cane. To maintain the petal formation, add wedges of colored or translucent clay between the petals to create a square or circle before reducing. Reduce the cane by gently rolling and stretching until it is the length / diameter desired. There are dozens of how-to videos on the internet if you cannot come up with your own designs.
How to Make a Rose Cane
You-Tube Video 4 Part Series - Part 1 / Part 2 / Part 3 / Part 4
- Cut the skinner blend cane into two, rolling the second half a smaller diameter.
- Cut the two canes into smaller pieces about one inch long. The center piece can be smaller. Flatten the smaller cane pieces with a slight bump in the center, showing the different colors on each end of the pieces. The center piece may be rolled into a small jelly roll. The larger cane pieces can have a larger bump. The bumps become the petals of the rose. If using a gradation cane, make sure to put the dark side facing center.
- Wrap the rest of the smaller pieces around the center jelly roll, alternating light and dark colors on top. I like to add a translucent contrast to the outside of my rose designs, or you can add white or black polymer clay to fill in around the petal formations. Reduce the cane by gently rolling and stretching until it is the length / diameter desired (usually around eight to twelve inches).
For more info, please visit my canemaking tutorial.
Pen Making Supplies
|
Pen Kits – Pen kits include all the components for making the pen style of your choice, including the pen tube, on which you will bake your clay creation. Some of the easiest pen kits I learned on are the following:
These pen kits are available from the manufacturers or various resellers, both online and at local retailers / stores. Search for pen kits online, and you will find what companies are available in your area, or just ask us for a reference. Bushings – bushings are used as a guide to match the outer diameter of the finished blank. Depending on the pen kit's depth and length you choose, the amount of clay needed may vary quite dramatically.
Pen Mandrel – pen mandrel, metal rod (with or without threads) or wooden dowel that fits through the bushings and tubes, helps to smooth the clay to the correct height / profile. Lathe – to help with turning oversized polymer clay tubes. Lathe, drill, or dremel may be used to buff or apply a finish on your clay. Pen Press or Vice – to help you assemble the pen kit once the clay tube is finished. |


Creating Pen Blanks
There are two basic methods in applying unbaked clay to the pen tubes, either in cane slices or sheet designs. For more info, please visit my pen making tutorial.
Using Canes to Make Pen Blanks
Cane slices can be thinly sliced and layered over a base of polymer clay or thickly cut and placed directly onto to the tube.
- To determine thickness of polymer clay slices, the main difference depends on how you plan to finish the pen. We describe how to apply either translucent layered thin slices or single thick slice designs below.
- As mentioned in the cane making tutorial, backfilling the flower design will allow the petal formation to remain intact. If you lose the desired petal formation, the reduced cane or individual slices can be manipulated afterwards by pressing a long bamboo skewer along the sides to create petal indentations on the flower pattern.
- For thin slices, apply a thin base coat of polymer clay to the pen tube. Make the base coat lower than the bushing requirements. Avoid trapping any air between the clay and tube or air bubbles will form when baking. For thick slices, apply until the tube blank is filled to meet or exceed the bushing height as desired. Some artists like to cure their pen tubes with glue prior to applying the clay in either method.
- To complete the thin sliced pen blank, add thin slices of your chosen cane to the base color, gently rolling flat in between layers. Depending on the type of pen tube you have chosen, it will take 18-30 small thin slices of cane to fill to the pen bushings. Avoid using too much pressure when rolling or it can distort the details of the clay design. Make the final clay thickness to be meet the bushing requirements and enough necessary for your chosen profile design and sanding impact. As stated before, the thick slice pen blanks either meet or exceed the pen bushings depending on how you plan to finish the pen. Trim the ends without exposing the ends of the pen tube. If turning the thicker patterns, we recommend carbide tools using light cuts with sharp tools.
For more info, please visit my pen making tutorial.
IMPORTANT POLYMER CLAY PEN MAKING TIPS
- The number of polymer clay slices varies according to the size of the blank, the number of other clay elements you want to use, and bushing height of the pen kit desired.
- Thin sliced designs do not allow for margin of error and cannot be corrected with finishing. They must be measured correctly to meet the bushing height or it will remove the thin clay designs during heavy sanding or turning.
- Thin slices must be cut paper thin to bake clear enough to see through to the next layer of clay beneath on the pen tube.
- Raw clay is very absorbent and will collect any dirt or other clay particles from your work surface or hands, so it is important to keep things clean as possible.
Sheet Designs / Textured Pen Blanks
Sheet designs in either thickness are usually measured for the rolled out dimensions of the tube (length x circumference) and decorated in patterns as desired. Some sheet designs have topical patterns or textures.

![]()
 |
 |
Baking Options
|
Countertop / Toaster Oven |
Kitchen Oven / Range |
 |
 |
I have used both toaster oven and household oven to bake clay according to the manufacturer's recommendations and years of practice. Depending on which brand of clay you are working with, your oven temperature may vary from 225-300 degrees Fahrenheit. Time also varies according to how many tubes I am baking at one time, they can stay in the oven from 15 - 45 minutes. It's important to know how your oven works to best use your set up. Having a good oven thermometer will help you monitor for temperature spikes or hot spots. Using the foil pan and covering with foil tent or another foil pan will help prevent some burning issues, but keep in mind the baking differences in brands of clay.

How to Finish Polymer Clay Pen Blanks
It's easier for me if I trim the ends of the clay design flush with the tubes before baking, but if you aren't sure how long the ends need to be, you may need to use sand paper or sanding mill verses a pen mill to finish the ends. Some people claim it's too rough on the clay, but we've not had any trouble with using a pen mill.
Smooth Pen Blanks
My pen blanks are designed to not require any turning to complete a pen, but whether it's ready to use or you turn it down on a lathe first, all polymer clay pen blanks look better after light sanding and buffing, especially the translucent areas.
If you want a high gloss finish (this method is best done on a lathe):
- Wet Sand – Abranet or comparable brand (usually 320-600 grit)
- Apply Mercury Thin CA glue (alternatives - Ren Wax, Hut Clear Coat, Craft Coat, Varathane Floor Finish, various water-based clay glazes )
- Micromesh (standard 1,500 – 12,000 grit pads)
For a natural matte finish, you can buff:
- By hand, with a rough cloth, such as blue jeans material
- By drill / Dremel using a buffing pad
- By buffing wheel
Textured Pen Blanks
My textured blanks have been sealed in liquid translucent clay, so the polymer clay texture has to be sized for proper fit to meet the nib. You are welcome to gently buff the blank, keeping in mind any harsh sanding may remove or damage the applied texture, paints, mica powders, glitter etc.
Turning Polymer Clay
Oversized clay pen blanks can be turned to meet the bushing requirements of your chosen pen kit. Turning polymer clay requires sharp carbide tipped tools with light cuts and sanding. It turns most like acrylic or softer woods and can be finished with CA or your favorite topcoat product. Keep in mind turning a clay blank may remove thinly sliced cane images or change the patterns depending on how you make your clay sheet designs. My husband Fred is the turner of the family and made this video on You-Tube.
Casting Polymer Clay
If you want to cast your clay designs after adding texture, paints, or other surface adornments, you need to make sure to undersize the clay so you will only turn away resin. Clay casts best in an epoxy resin in the appropriate tube-in silicone mold like we sell at PTownSubbie. Pressure pot is not mandatory for epoxy casting, but if you already have one, it helps to prevent any large bubbles from forming on the surface.
Casting your clay creations makes the pen blank just like other resin pens. You will need a lathe to turn it to bushing size, then use the same sanding, buffing, and plastic polish your normally use for a finish.

 |

|
Thanks for reading our polymer clay class curriculum. If you have any other questions, or would like to see more tutorials, please visit our tutorial page.
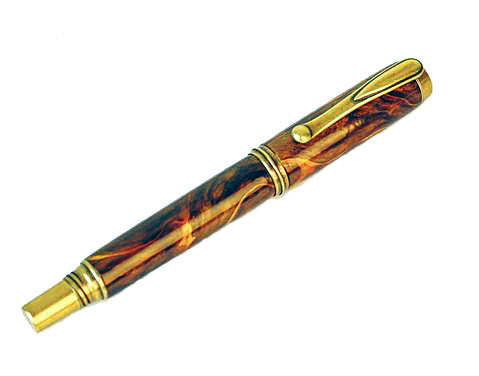
My Favorite Polymer Clay Pens